My wife and I planned on having a small photobooth at our wedding in case people wanted to print and keep a small memento. A week before the wedding I had a few ideas pop up that I thought would be fun to incorporate into the photobooth. Unfortunately you end up kind of busy doing a bunch of other things the week of your wedding, so I didn't get to finish this photobooth in time. To round out the learning process I did complete it after the wedding - this project documents the build.
Table of Contents
Existing Solutions
Tablet/Phone Apps SimpleBooth or myphotoboothapp seem to be effective apps, but lack the customization I thought would be entertaining. Requires hardware.
Rental Rental photobooths are available in our area, but they tend to be pricy and require an attendant for the night.
Python Application Pibooth looks to be a great application and would certainly get the job done. This would be the preferred solution if I wasn't looking for a learning exercise. Requires hardware.
Software
I wanted to implement a few novel things in this photobooth:
Completely touchless operation
Different interaction modalities
Landing screen minigame
Automatic cloud upload of full-res media
Architecture
In order to interact touchlessly with the application we'll rely on some human pose detection and image processing. The Python ecosystem offers plenty of existing libraries to do all of the heavy lifting, so we'll write the entire application in Python.
PySimpleGUI offers an impressive set of features and seemed to cross off everything I was looking for in a GUI. It was my first time using this package and it will likely see future use.
The general outline I assumed for this application was a collection of "layouts", each with distinct elements, for each planned user interaction. The layouts are all children of the main window environment and get shown/hidden as necessary. 
OpenCV will be used for image capture and manipulation.
Google's Mediapipe performs impressively lightweight face, hand, and pose recognition and is used extensively throughout.
Landing
The landing page houses most of the fun stuff. This is where the user will select their chosen modality and this is where they will be able to play the minigame. The layout should looke like: 
This is easy enough to create in PySimpleGUI layout language:
LANDING_LAYOUT = [
        [sg.Text('Welcome to Our (touch free) Photobooth!', font='AmaticSC 100')],
        [sg.Image('cam_placeholder.png', key='landing_im')],
        [sg.Text('please select an option above with your camera hands',justification='center', size=(100,1), font='AmaticSC 60')],
        [sg.Column([[sg.Text('Current Score: 0', font='AmaticSC 20',justification='right', pad=0, key='current_score'),]], pad=0,justification = 'right', element_justification = 'right')],
        [sg.Column([[sg.Text('High Score: 0', font='AmaticSC 20',justification='right', pad=0, key='high_score'),]], pad=0,justification = 'right', element_justification = 'right')],
        [sg.Column([[sg.Image('score_placeholder.png', key='high_score_face'),]], pad=0,justification = 'right', element_justification = 'right')]
    ]
While the landing page is in operation we feed the image placeholder new encoded .png images when they are ready from the camera. The minimal functional loop looks something like:
cap = cv2.VideoCapture('/dev/video0')
gui = sg.Window('Erin & Jacob Photobooth', layout, element_justification='c', resizable = True, margins=(0,0), return_keyboard_events=True, location=(2000,0))
while True:
    event, values = gui.read(25)
    ret,frame = cap.read()
    frame = cv2.flip(frame, 1)
    gui['landing_im'].update(data=cv2.imencode('.png', frame))[1].tobytes())
The first thing we'll add are the overlay rectangles on the image frame that show the available selections:
# Define rectangles
S_coords = [(0.1,0.08), (0.4,0.08), (0.7,0.08)]
S_labels = ["PHOTOSTRIP", "FLIPBOOK", "VIDEO"]
S_box = (0.2,0.15)

# Apply to each frame
for c,t in zip(S_coords,S_labels):
    cv2.rectangle(frame,
            (int(c[0]*cap_x), int(c[1]*cap_y)),
            (int((c[0]+S_box[0])*cap_x), int((c[1]+S_box[1])*cap_y)),
            (0,0,0),
            -1)

    TEXT_FACE = cv2.FONT_HERSHEY_DUPLEX
    TEXT_SCALE = 0.6
    TEXT_THICKNESS = 1
    text_size, _ = cv2.getTextSize(t, TEXT_FACE, TEXT_SCALE, TEXT_THICKNESS)
    text_origin = (int((c[0]+S_box[0]/2)*cap_x) - text_size[0] // 2, int((c[1]+S_box[1]/2)*cap_y) + text_size[1] // 2)
    cv2.putText(frame,
            t,
            text_origin,
            TEXT_FACE,
            TEXT_SCALE,
            (255,255,255),
            TEXT_THICKNESS)
Then we'll add the ability to track all the hands in the frame and give those hands the ability to select a rectangle by moving within its bounds.
selection_counter = [0 for _ in S_coords]
needed_count = 10 #required frames for selection

with mp.solutions.hands.Hands(
        min_detection_confidence=0.6,
        min_tracking_confidence=0.5,
        max_num_hands = 10) as hands:

    this_frame_select = [False for _ in S_coords]

    res_hands = hands.process(image)
    if res_hands.multi_hand_landmarks:
        for hand_landmarks in res_hands.multi_hand_landmarks:

            #Find center of hands and annotate frame
            cx = np.mean([a.x for a in hand_landmarks.landmark])
            cy = np.mean([a.y for a in hand_landmarks.landmark])
            cv2.circle(frame, (round(cx*frame.shape[1]), round(cy*frame.shape[0])), 10, (255,0,255), -1)

            #Check each box to see if hand is within bounds
            for i,c in enumerate(S_coords):
                if (cx > c[0]) and (cx < c[0]+S_box[0]) and (cy > c[1]) and (cy < c[1]+S_box[1]):
                    this_frame_select[i] = True
                    selection_counter[i] += 1

                    # Check to see if we have fully selected this option
                    if selection_counter[i] >= needed_count:
                        return i

            # If we aren't selecting this box this time, decrement the counter (but not below 0)
            for i,tf in enumerate(this_frame_select):
                if not tf and S[i]>0:
                    selection_counter[i] -= 1

            # If in the process of selecting, draw a green rectangle that changes size to show nearness to selection
            for c,s in zip(S_coords,selection_counter):
                if s > 0:
                    cv2.rectangle(frame,
                            (round((c[0]+0.5*s/needed_count*S_box[0])*cap_x), round((c[1]+0.5*s/needed_count*S_box[1])*cap_y)),
                            (round((c[0]+0.5*s/needed_count*S_box[0]+S_box[0]-s/needed_count*S_box[0])*cap_x), round((c[1]+0.5*s/needed_count*S_box[1]+S_box[1]-s/needed_count*S_box[1])*cap_y)),
                            (0,255,0),
                            2)
So far this is what we have on the landing page:
Let's add the minigame. This is what we are shooting for:

First we will track all the heads of our photobooth participants. We want a track to follow detections from frame to frame, resize itself if a head gets bigger or smaller, and rotate when a head rotates. The code that does most of the work looks like:
#Define a tracked face object
class TrackedFace:
    def __init__(self, points, cam_x, cam_y):
        self.live = True
        self.points = points
        self.cam_x = cam_x
        self.cam_y = cam_y
        c_c, c_rad, c_rot = self.ear_circle()
        self.c_c = c_c
        self.c_rad = c_rad
        self.c_rot = c_rot
        self.X = c_c[0]
        self.Y = c_c[1]
        self.dia = 2*c_rad

    def still_alive(self):
        self.live = True

    def reset(self):
        self.live = False

    def ear_circle(self, face_bigger=1.2):
        lx = self.points[4][0] * self.cam_x
        ly = self.points[4][1] * self.cam_y
        rx = self.points[5][0] * self.cam_x
        ry = self.points[5][1] * self.cam_y
        dia = np.math.sqrt((lx-rx)**2 + (ly-ry)**2)
        rad = face_bigger * dia/2
        c = (round((lx+rx)/2), round((ly+ry)/2))
        rot = np.arctan2(ly-ry,lx-rx)
        return c, rad, rot

track_list = []

with mp.solutions.face_detection.FaceDetection(min_detection_confidence=0.4) as face_detection:
    face_res = face_detection.process(image)

    if face_res.detections:
        for detection in face_res.detections:
            kp = [(d.x, d.y) for d in detection.location_data.relative_keypoints]
            lx = kp[4][0] * cap_x
            ly = kp[4][1] * cap_y
            rx = kp[5][0] * cap_x
            ry = kp[5][1] * cap_y
            cx = (lx+rx)/2 #center coords of tracked face
            cy = (ly+ry)/2 #center coords of tracked face

            max_thresh = 1.0
            best_thresh = max_thresh*2
            best_track = None
            for face in track_list:
                tx = face.X
                ty = face.Y
                tr = face.c_rad
                d = np.math.sqrt((tx-cx)**2 + (ty-cy)**2)
                n_d = d/tr
                if n_d < best_thresh:
                    best_thresh = n_d
                    best_track = face
            if best_thresh < max_thresh: #Then we will call the face the same - this isn't perfect so you can still "shake off" the stuck heads. Testing shows this is a feature.
                best_track.still_alive()
                best_track.X = round(cx)
                best_track.Y = round(cy)
                best_track.c_c = (round(cx),round(cy))
                best_track.c_rot = np.arctan2(ly-ry,lx-rx)
                best_track.dia = np.math.sqrt((lx-rx)**2 + (ly-ry)**2)

            else: #new track
                best_track = TrackedFace(kp, cap_x, cap_y)
                track_list.append(best_track)

            if annotate:
                mp.solutions.drawing_utils.draw_detection(frame, detection)
                cv2.circle(frame, best_track.c_c, round(best_track.c_rad), (255,0,0))
                lx = int(round(best_track.X + best_track.c_rad*np.cos(best_track.c_rot)))
                ly = int(round(best_track.Y + best_track.c_rad*np.sin(best_track.c_rot)))
                cv2.circle(frame, (lx, ly), 8, (255,0,0), -1)
We want the flying heads to originate from either the side walls or the upper border of the frame. They will be generated with a randomly drawn size, spin rate, and launch angle. We'll pick a "launch velocity" such that they will intersect their randomly drawn target when following a ballistic trajectory enforced with some artificial gravity. They should be able to determine when they are near enough to another head to become stuck, from which point their movements will be dictated by the sticky connection instead of following the ballistic arc.
class FlyingHead:
    def __init__(self, P_t, image, rad, s_a, cam_x, cam_y, a = 10, w_max = 60, head_scale = 0.8):

        Xt = P_t[0]
        Yt = P_t[1]
        dia = round(2*rad)

        self.cam_x = cam_x
        self.cam_y = cam_y

        pix_avail = self.cam_x + 2*Yt
        pix_select = np.random.randint(0,pix_avail)
        if pix_select < Yt:
            Xi = -dia
            Yi = Yt - pix_select
            Ai = np.random.rand() * 3.14/3
        elif pix_select < Yt + self.cam_x:
            Yi = -dia
            Xi = pix_select - Yt
            if Xi < Xt:
                Ai = np.random.rand() * 3.14/4
            else:
                Ai = 3.1415 - np.random.rand() * 3.14/4
        else:
            Xi = self.cam_x + dia
            Yi = pix_select - self.cam_x - Yt
            Ai = 3.14 - np.random.rand() * 3.14/3

        dX = Xt - Xi
        dY = Yt - Yi

        v = np.math.sqrt(0.5*a*dX**2/(np.math.cos(Ai)**2)/(dY + dX*np.math.tan(Ai)))

        self.X = Xi
        self.Y = Yi
        self.Vx = v * np.math.cos(Ai)
        self.Vy = -v * np.math.sin(Ai)
        self.a = a
        self.im = cv2.resize(cv2.imread(image, -1), (dia, dia))
        self.dia = dia * head_scale
        self.rad_px = round(dia/2)
        self.w = -w_max + 2*w_max*np.random.rand()
        self.thet = np.random.rand() * 360
        self.stuck = False
        self.track = None
        self.stuck_d = None
        self.stuck_thet = None
        self.orig_rot = None
        self.points = s_a

    def move(self, dt):
        if self.stuck and self.track.live:
            xt = self.track.X
            yt = self.track.Y
            thet = self.stuck_thet + (self.track.c_rot-self.orig_rot)

            d = self.stuck_d
            X_new = xt + d*np.math.cos(thet)
            Y_new = yt + d*np.math.sin(thet)
            self.Vx = (X_new - self.X) /dt
            self.Vy = (Y_new - self.Y) /dt
            self.X = X_new
            self.Y = Y_new
            self.thet = self.orig_rot_thet - (self.track.c_rot-self.orig_rot)*57.3

        else:
            self.stuck = False
            self.X += self.Vx * dt
            self.Y += self.Vy * dt
            self.Vy += self.a * dt
            self.thet += self.w * dt

    def near(self, track, thresh=1.0):
        x1 = self.X
        y1 = self.Y
        x2 = track.X
        y2 = track.Y
        return np.math.sqrt((x2-x1)**2 + (y2-y1)**2) < thresh*(self.dia+track.dia)/2

    def pos(self):
        return (round(self.X), round(self.Y))

    def draw(self, frame):
        add_overlay(frame, imutils.rotate(self.im, self.thet), round(self.X-self.rad_px), round(self.Y-self.rad_px))

    def stick(self, track):
        self.stuck = True
        self.track = track

        x1 = self.X
        y1 = self.Y
        x2 = track.X
        y2 = track.Y
        self.stuck_d = np.math.sqrt((x2-x1)**2 + (y2-y1)**2)
        thet = np.arctan2(y1-y2,x1-x2)
        self.stuck_thet = thet
        self.orig_rot_thet = self.thet
        self.orig_rot = track.c_rot
Now we can tie the flying and tracked heads together inside the video processing loop! And then we can sum up the current score. If this is the best score of the day, grab a snapshot of the current players and add it to the landing page.
# Spawn a flying head about every 5th frame if there are people using the photobooth
head_list = []
if face_res.detections:
    p_spawn = 0.2
    max_heads = 40
    if np.random.rand() < p_spawn and len(head_list)<max_heads:
        targ = random.choice(track_list)

        # Pick either a Jacob head or an Erin head at random (50% chance of picking either)
        if np.random.rand() > 0.5:
            face_pic = random.choice(JACOB_PICS)
            score_associated = -2
        else:
            face_pic = random.choice(ERIN_PICS)
            score_associated = 1

        head_size_min = 25
        head_size_max = 45
        head_size = head_size_min + (head_size_max-head_size_min)*random.random()
        head_list.append(FlyingHead(targ.c_c, face_pic, head_size, score_associated, cap_x, cap_y, a=20))

points = 0
for head in head_list:
    head.move(loop_dt)

    if head.Y > CAM_Y: #remove heads that were missed
        head_list.remove(head)
        continue

    if not head.stuck: #heads stick to tracks
        for track in track_list:
            if head.near(track):
                head.stick(track)
                break

    if not head.stuck: #heads stick to stuck heads
        for head2 in head_list:
            if head2.stuck and head.near(head2):
                head.stick(head2.track)
                break

    if head.stuck:
        points += head.points

gui['current_score'].update('Current Score: ' + str(points))

if points > HIGH_SCORE_TODAY:
    HIGH_SCORE_TODAY = points
    gui['high_score'].update('High Score: ' + str(points))

    high_score_face_pics = []
    for track in track_list:
        res = im2.copy()
        mask = np.zeros_like(im2)
        mask = cv2.circle(mask, (track.X,track.Y), round(track.c_rad), (255,255,255), -1)
        res[:, :, 3] = mask[:,:,0]

        res = res[track.Y-round(track.c_rad):track.Y+round(track.c_rad), track.X-round(track.c_rad):track.X+round(track.c_rad)]
        high_score_face_pics.append(cv2.resize(res,(80,80)))

    gui['high_score_face'].update(data=cv2.imencode('.png', cv2.hconcat(high_score_face_pics))[1].tobytes())  # Update image in window
The game in action looks like:
Photostrip
The photostrip interaction modality is the standard photobooth use case. We show the users a live video feed, take 4 snapshots, jazz them up a bit, and print them out.

There are a few places here where we want to do multiple things simultaneously. For example, we want to create the Google Photos album while the user is taking the photostrip pictures. We will make use of Python's asynchronous capabilities to accomplish this.

For interacting with Google Photos we make use of gphotospy, an easy to use Python implementation of the Google Photos API.
service = authorize.init(CLIENT_SECRET_FILE)
ALBUM_MANAGER = Album(service)
async def init_album(id):
    # Create a new album
    new_album = ALBUM_MANAGER.create(id)

    # Get ID and set share options
    id_album = new_album.get("id")
    share_results = ALBUM_MANAGER.share(id_album)
    shareUrl = share_results["shareableUrl"]
    return id_album

# Kick off album creation
task_init_album = asyncio.create_task(init_album(id))

# Do other stuff...

# Wait for album creation to return
id_album = await task_init_album
The images snapped by the photostrip application need to be formatted before printing. I designed a template that fit with the rest of the wedding theme for our printed photostrips. It looks like: 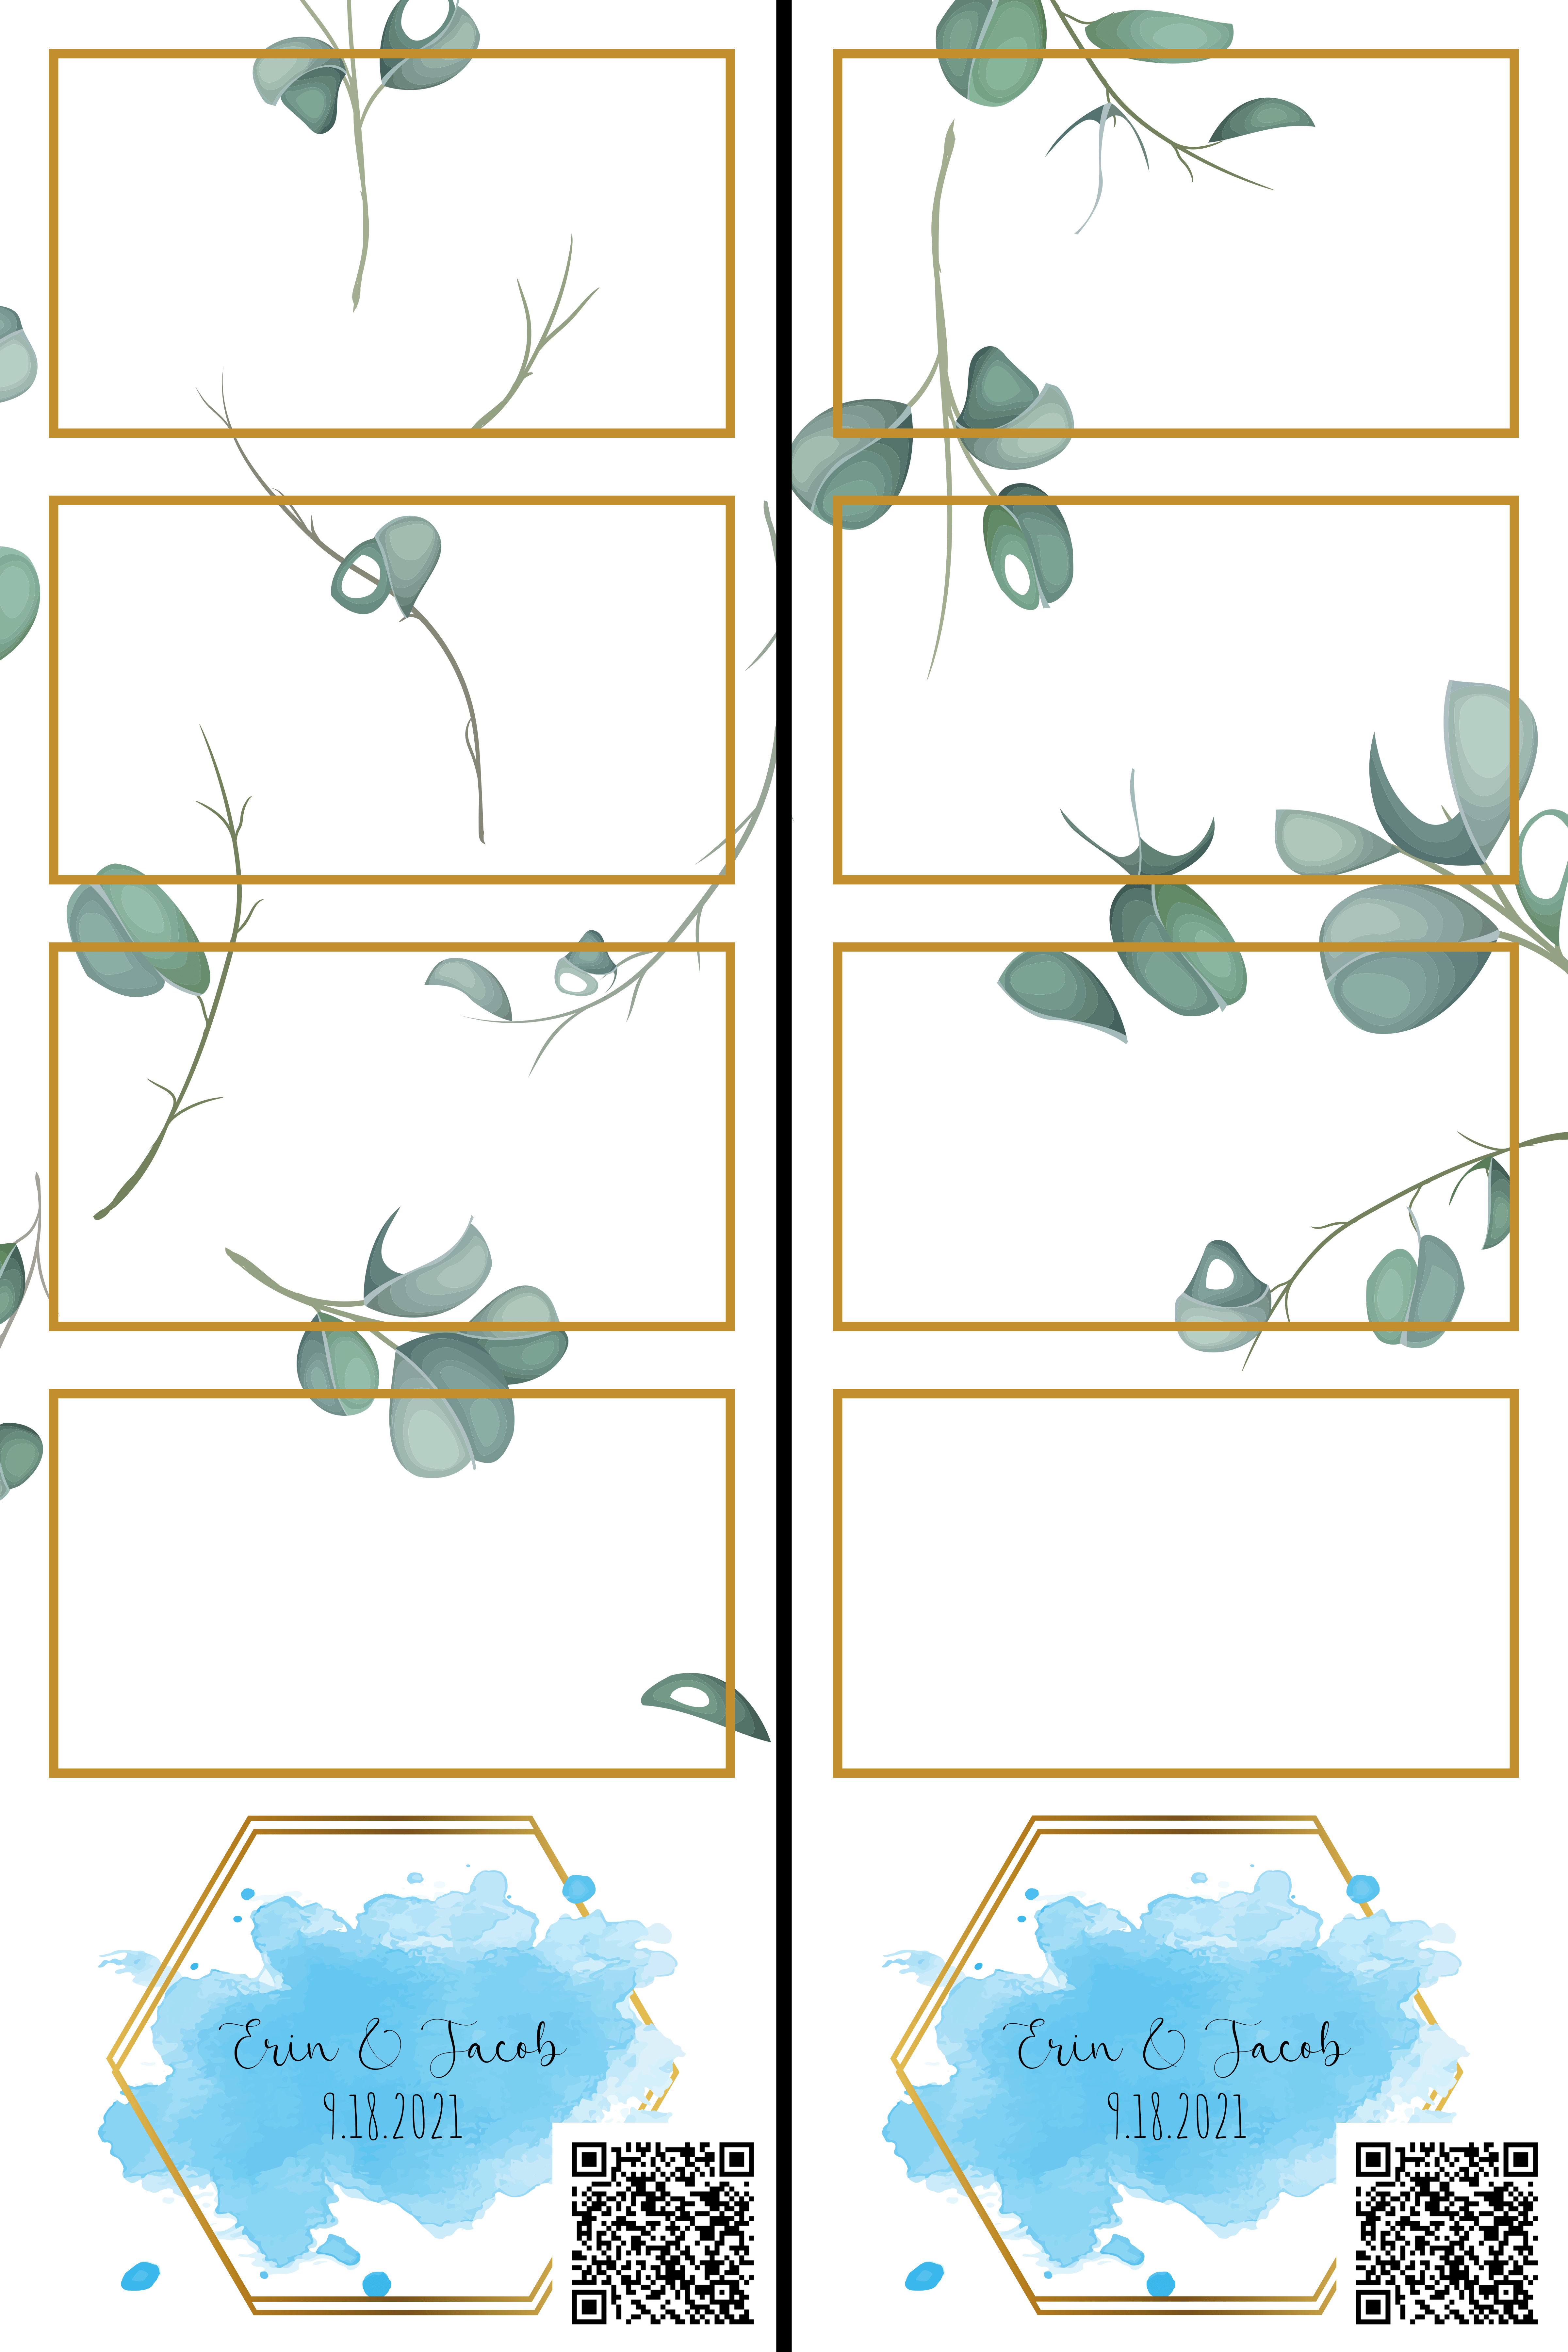
PIL is used to place the images into the template and add the strip-specific QR code to the bottom right (and overlay with a few more leaves for good measure).
class PhotoStrip:
    BG = "ps_template_base.png"
    FG = "ps_template_overlay.png"

    #Location of rectangles
    tl_coords = [   [(177, 177), (2577, 177)],
                    [(177,1544), (2577,1544)],
                    [(177,2912), (2577,2912)],
                    [(177,4279), (2577,4279)]
                ]
    p_w = 2225-177
    p_h = 1313-177
    tl_QR = [(1690, 6497), (4090,6497)]
    QR_w = 2376-1690
    QR_h = 2376-1690

    def __init__(self):
        self.idx = 0
        self.im = Image.open(self.BG)
        self.im = self.im.convert('RGBA')

    def show(self):
        self.im.show()

    def add_im(self, im):
        im = im.resize((self.p_w, self.p_h), resample=Image.LANCZOS)
        self.im.paste(im,self.tl_coords[self.idx][0])
        self.im.paste(im,self.tl_coords[self.idx][1])
        self.idx += 1

    def add_QR(self, qr):
        qr = qr.resize((self.QR_w, self.QR_h))
        self.im.paste(qr, self.tl_QR[0])
        self.im.paste(qr, self.tl_QR[1])

    def save(self, fname):
        fg_im = Image.open(self.FG).convert("RGBA")
        self.im.paste(fg_im,mask=fg_im)
        self.im.save(fname, quality=95)
After completing the photostrip all the media is uploaded to the shared Google Photos album. The user is presented with a QR code on screen to view the album and the QR code is provided on the printed photostrip.
Flipbook
The flipbook modality gives the user a chance to create a physical flipbook and a digital .gif. The interaction is much the same as the photostrip described above. The user takes 15 snapshots which are compiled into a gif, which is uploaded to their new Google Photos album: 
The snapshots are also formatted into a 8.5x11 image that is printed onto plain printer paper. The user is shown instructions for cutting and stapling the paper into a physical flipbook to take home. It works, sort of! 
Video
The video selection allows the user to record a 30 second video. It doesn't provide a physical manifestation, but rather just uploads the video to a Google Photos album. The tricky part (for me) here was maintaining a full quality, full framerate recording while presenting the processed live video to the user in the application.
To accomplish this I used v4l2loopback to create two dummy video feeds, /dev/video1 and /dev/video2. A gstreamer pipeline plumbs everything together. There may be a few unnecessary queues in the resulting pipeline, but it works.

# Make dummy video devices
sudo modprobe v4l2loopback video_nr=1,2

# Initiate pipeline
gst-launch-1.0 -e v4l2src device=/dev/video0 do-timestamp=true ! image/jpeg,width=1920,height=1080,framerate=30/1 ! jpegdec ! videoconvert ! tee name=t t. ! queue  ! videoscale ! 'video/x-raw,width=1280,height=720' !  v4l2sink device=/dev/video1 sync=false t. ! queue  !  v4l2sink device=/dev/video2 sync=false

# Throw switch to start recording
gst-launch-1.0 -e v4l2src device=/dev/video2 ! x264enc tune=zerolatency ! mp4mux name=mux  ! filesink location='vid.mp4' sync=false alsasrc ! lamemp3enc ! queue ! mux.
Extras
Paper Refill
The printer I borrowed from work was very large, but not large enough to house more than 20 glossy 4x6 sheets for printing photostrips. My cousin (shoutout Jack) volunteered to replace the paper as needed during the night. Instead of requiring constant monitoring the system tracked (well, open-loop tracked) the amount of paper left in the tray and texted Jack when the situation got dire. This was done with the yagmail package and the Verizon SMS gateway:
import yagmail
yag = yagmail.SMTP()
yag.send('PHONENUMBER@vzwpix.com', '', 'Help, I am running out of glossy paper!')
LED Strip
I had a WS2811 LED strip lying around and thought it might bring some life to the physical photobooth. It ended up looking okay, but would probably have looked much better about 5 times as many lights.
The LED strip itself was controlled by an Arduino, which was connected over USB serial to the laptop running the photobooth. The LED strip operated in two modes that were triggered with specific serial commands.
The standby command put the LEDs in TwinkleFox. This is provided as an example in the FastLED library and has the lights fade in and out at random in a pleasing pattern.
While the photobooth is in operation the LEDs are used to communicate a countdown timer to the user. This again makes use of the FastLED library to do the heavy lifting, we just need to receive the serial command and pick which lights turn on.
# Connect to Arduino
ARDUINO = serial.Serial(port="/dev/ttyACM0", baudrate=9600, timeout=.1)

# In the event loop, write to serial port
ARDUINO.write(bytes(str(round(NUM_LEDS*time_elapsed/time_allowed)) + "\r", 'utf-8'))
inNum = Serial.parseInt();
for(int i = 0; i < NUM_LEDS; i = i + 1) {
if (i < inNum) {
leds[i] = CRGB::White;
} else {
leds[i] = CRGB::Black;
}
}
FastLED.show();Hardware
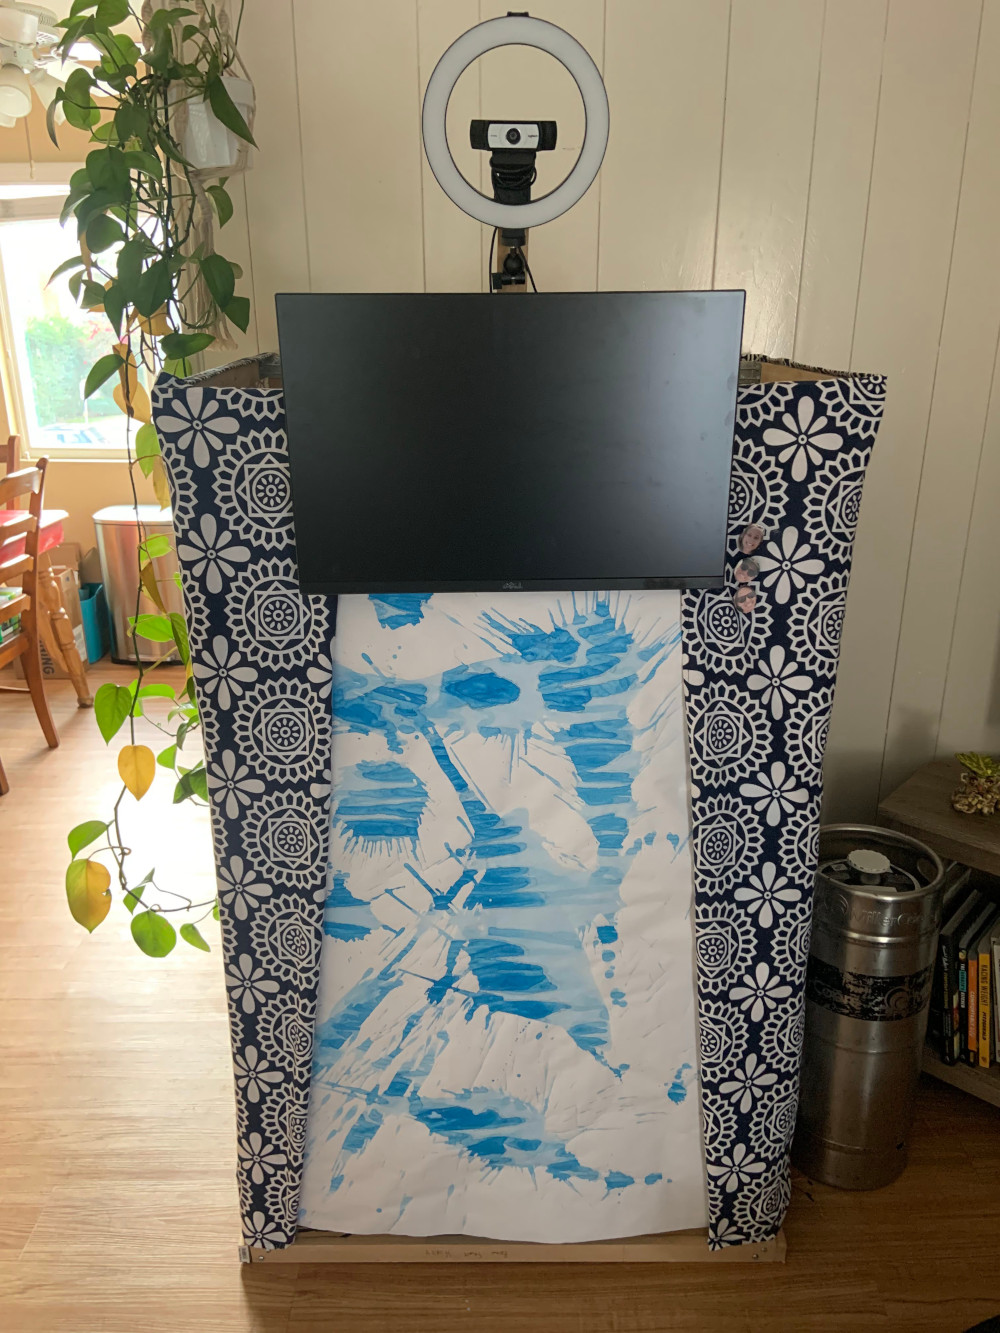
The photobooth itself ended up being slightly imposing. This is mostly because the only two-tray printer I had access to was massive.
Architecture
By the end of the project there were quite a few components to keep track of. I had to track down a larger USB hub to accomodate everything: 
Frame
The simple frame was constructed with 1x2 furring strips cut haphazardly to length. The corners are joined with bolts, wing nuts, and small angle brackets. This allows for easy disassembly and assembly. 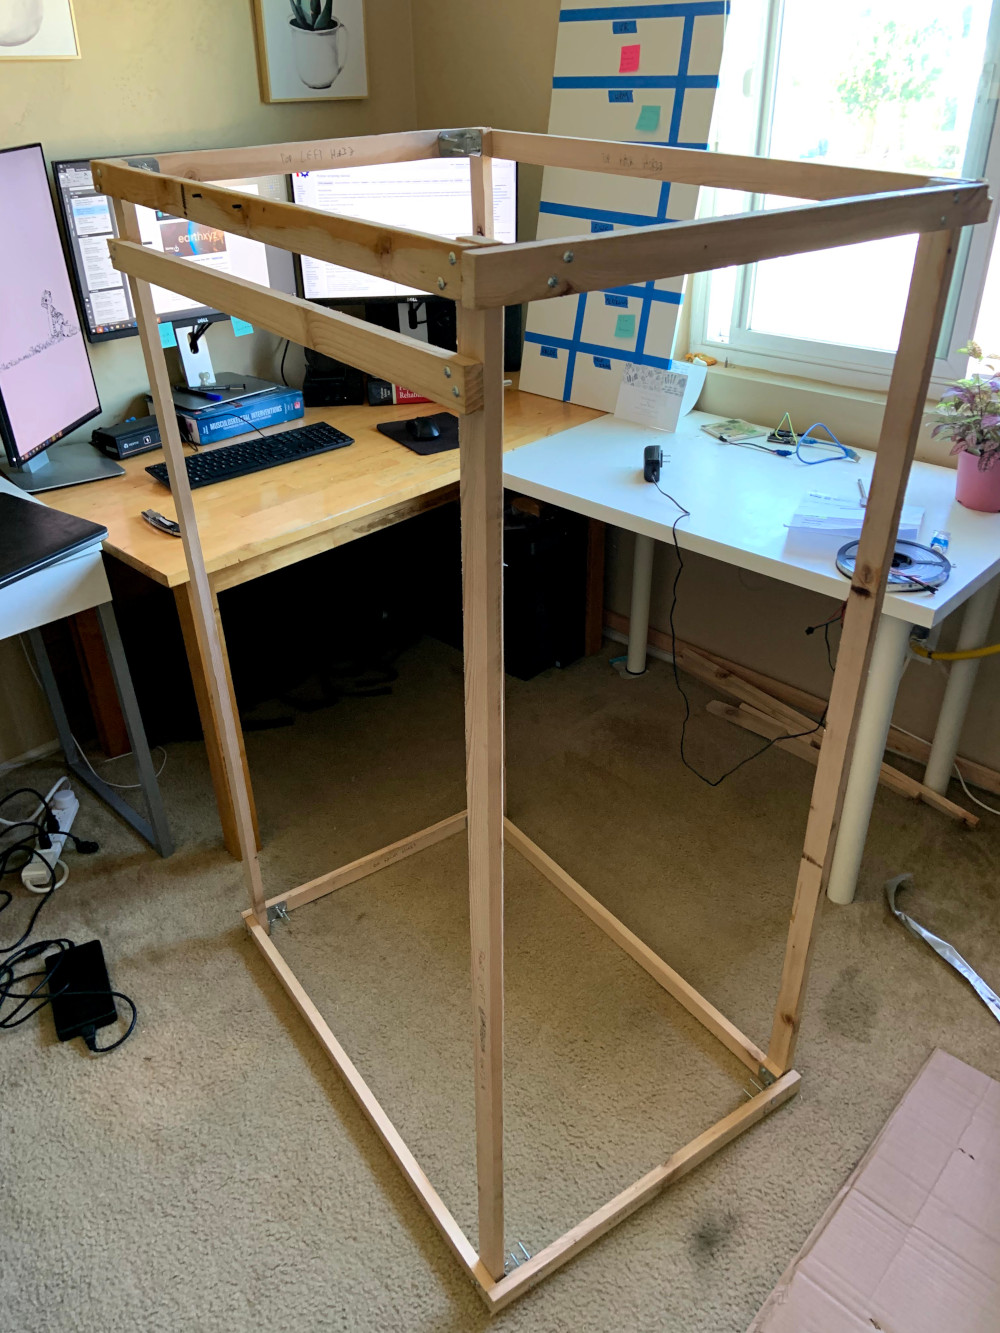
The monitor can be attached directly to the frame with its VESA mount. The WS2811 LED strip was ziptied to a large piece of cardboard which is attached to the frame with some more zip ties. 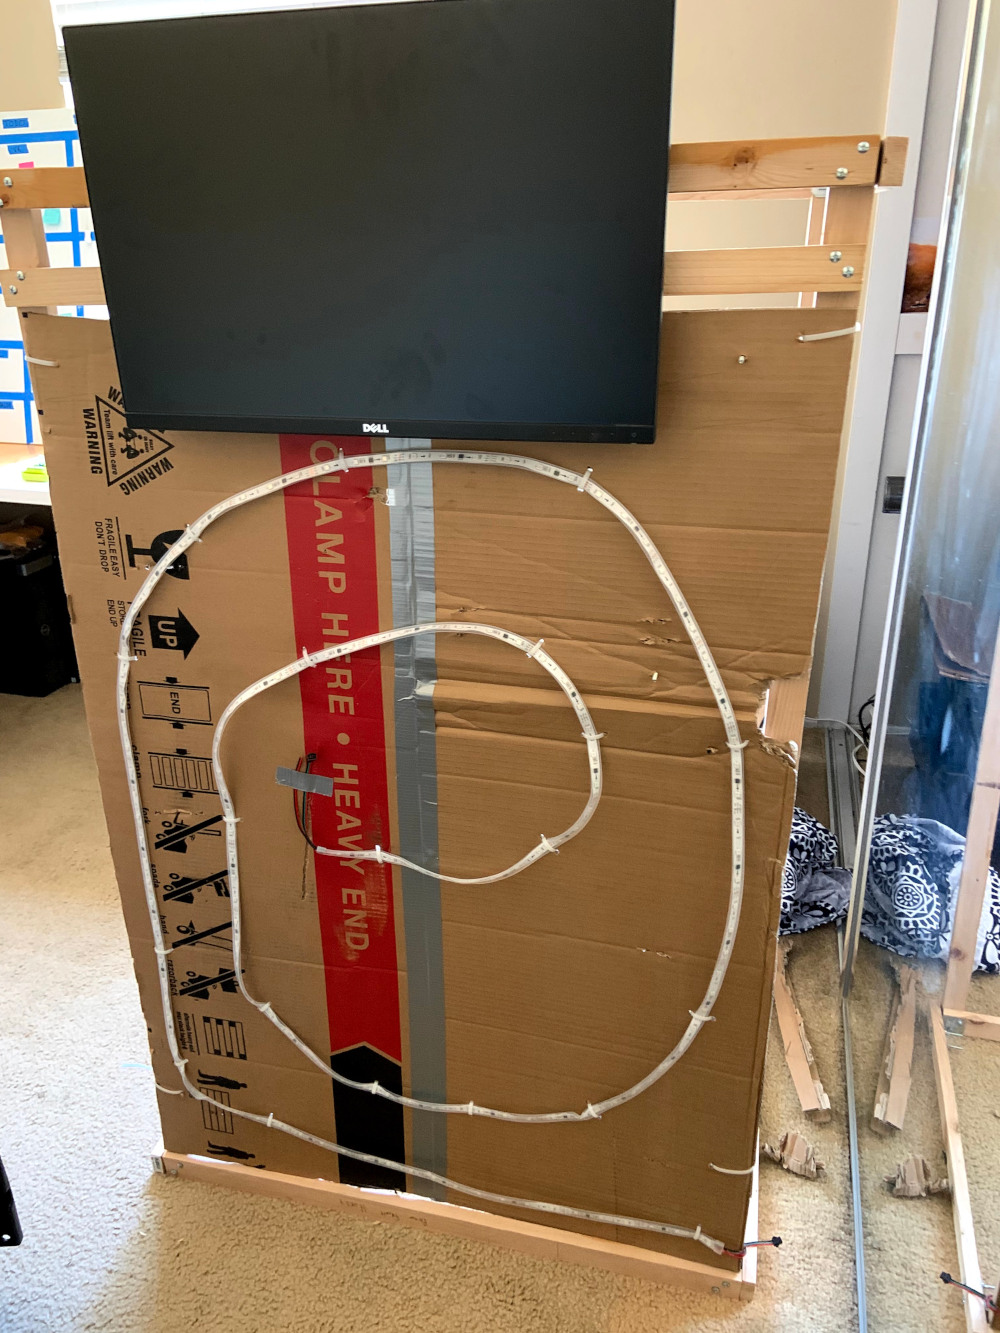
The original intent was to wrap the entire frame in a watercolor blue mural. Unfortunately the original watercolor attempt didn't make it back after the wedding. The remainder of the paper was painted (a little too splashy, and didn't quite get it to dry uniformly) and used to cover the front of the photbooth. A tablecloth from the rehearsal dinner was used to cover the rest of the frame.
Ingredients
PySimpleGUI - Python GUI For Humans
OpenCV - Open source computer vision
Mediapipe - Google ML live/streaming image processing
Excalidraw - diagram creation
gphotospy - Google Photos Python library
PIL - Python Imaging Library
qrcode - QR code generation in Python
yagmail - Python GMAIL/SMTP client